ULX3S
ULX-DOOM
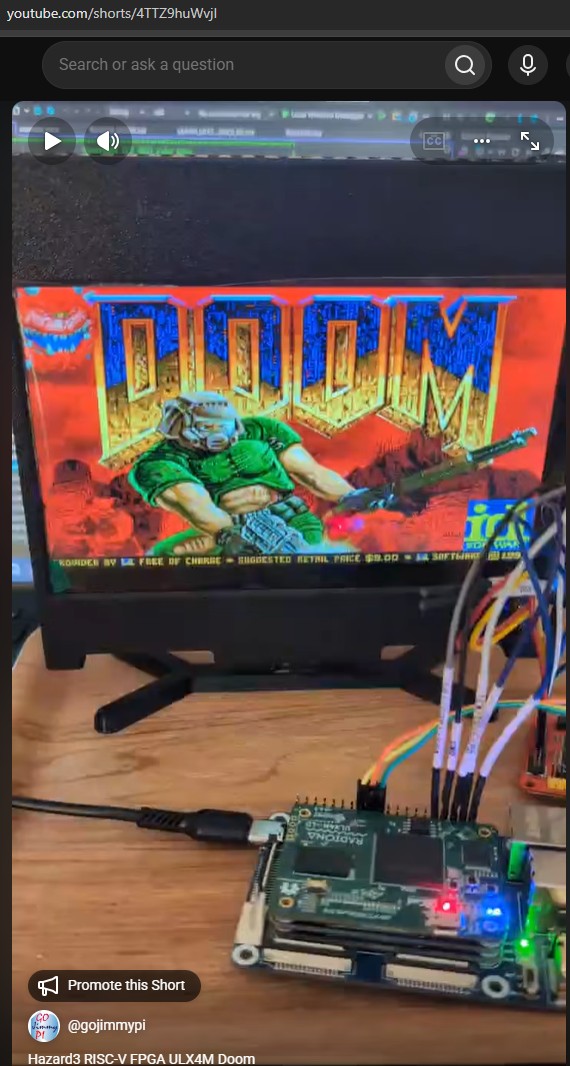
Doom on the ULX3S 85F, ULX3S 12F, and ULX4M-LD 85F using Luke’s Hazard3 RISC-V soft FPGA CPU with HDMI output and JTAG single-step debug capabilities.
 |
||
| youtube.com/shorts/4TTZ9huWvjI |
See Hazard3-Doom and the ulx-doom branch of Hazard3 Fork.
Full documentation at hazard3-doom.readthedocs.io
Conceptually:
- Configure the FPGA with the Hazard3 RISC-V SoC bitstream. On Windows, the ULX3S on-board FT231X driver depends on the host tool: WinUSB for the browser WebUSB flasher, FTDI VCP/D2XX for Windows
fujprog, and WinUSB or libusbK for the current OpenOCDft232rpath. ULX4M-LD uses its separate Micro-B DFU bootloader for FPGA programming and an external Tigard for JTAG/UART debug. - Load or update the resident monitor through OpenOCD/GDB when doing a software-only monitor build.
- Upload the packaged Doom
.h3imgimage over the separate UART connection, or stage it asDOOM.IMGon micro-SD. - Upload/use a compatible Doom IWAD containing the game data.
- Optionally connect to the UART console with the browser Web Serial UI or a terminal program and run diagnostics.
- Optionally single-step debug a program running on the soft RISC-V CPU using
gdbor VisualGDB.
Windows ULX3S USB driver compatibility
The table below applies to the on-board ULX3S FT231X on US1. It does not describe the separate CH340/CH341, CP210x, FTDI-UART, or other external USB-to-UART adapter used by the Hazard3-Doom Web Serial console.
| Tool / path | WinUSB | FTDI VCP/D2XX | libusbK |
|---|---|---|---|
| OpenOCD (ULX3S FT231X JTAG) | Works | No | Works |
| GDB through OpenOCD | Works | No OpenOCD transport | Works |
| Hazard3-Doom WebUSB FPGA/JTAG flasher | Works | No | No |
| Windows fujprog / FTDI D2XX tools | No | Works | No |
| Web Serial UART / PuTTY on an external USB-UART adapter | N/A | N/A | N/A |
For the current Hazard3-Doom workflow, WinUSB is the most convenient FT231X binding when both OpenOCD/GDB and the browser WebUSB flasher are needed. Switch back to FTDI VCP/D2XX only when an FTDI-native tool such as Windows fujprog requires it. Changing the FT231X driver does not reset an already configured FPGA.
Quickstart
Here are some instructions for getting started quickly with Doom on the ULX3S 85F, compact ULX3S 12F, and ULX4M-LD 85F.
Any compatible HDMI display can be used. The documentation also includes the Elecrow seven-inch HDMI panel as a compact example with an optional 3D-printable ULX3S enclosure.
See the docs for a no-install quick start, too.
Fetch Hazard3-Doom
The Hazard3-Doom repository contains submodules; be sure to clone it recursively from your workspace directory.
WORKSPACE=/mnt/c/workspace
# or
WORKSPACE=~/workspace

cd "${WORKSPACE}"

git clone --recurse-submodules https://github.com/ulx3s/Hazard3-Doom.git

cd Hazard3-Doom
Or when testing a specific branch:
git clone \
    --branch develop \
    --recurse-submodules \
    https://github.com/gojimmypi/Hazard3-Doom.git
When cloning onto a Windows filesystem from WSL, disable automatic line-ending conversion and file-mode tracking:
cd "${WORKSPACE}"

git -c core.autocrlf=false clone --recurse-submodules https://github.com/ulx3s/Hazard3-Doom.git

cd Hazard3-Doom

git config core.autocrlf false
git config core.filemode false
Ensure submodules are current
For an existing clone directory:
git submodule update --init --recursive
No Local Toolchain
A local FPGA/RISC-V build toolchain is not required for the browser-based ULX3S 85F quick-start path. The preferred published prebuilt files are in the bin directory:
- ULX3S 85F:
fpga_ulx3s_85f.bitandhazard3-doom-ulx3s-85F.h3img - ULX3S 12F:
fpga_ulx3s_12f.bitandhazard3-doom-ulx3s-12F.h3img
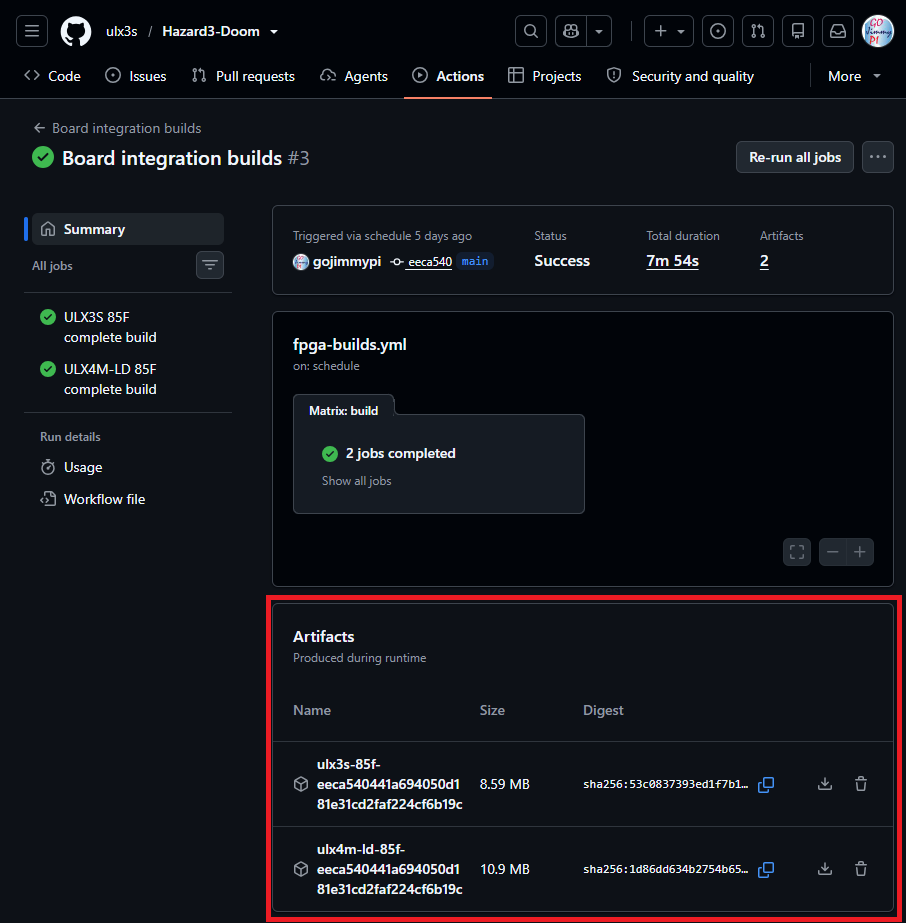
Use bin/INVENTORY.md and the checksum inventory to identify and verify the published files. The Board integration builds workflow is a second source for recent successful artifacts, but workflow artifacts are temporary.
The ULX3S 12F still requires a local Hazard3-Doom checkout with OpenOCD/GDB after FPGA programming because its compact FPGA image contains only a 1 KiB UART bootstrap; the full monitor is loaded into SDRAM with ./scripts/load-firmware-12f.sh.
Check Build Tools
Ensure the required build tools are installed.
export PATH="/opt/riscv/bin:$PATH"

for tool in \
    shellcheck \
    make \
    python3 \
    yosys \
    nextpnr-ecp5 \
    ecppack \
    riscv32-unknown-elf-gcc \
    riscv32-unknown-elf-objcopy
do
    command -v "$tool" || echo "MISSING: $tool"
done
Windows users can download the RISC-V toolchain from Sysprogs, or use the files in Hazard3-Doom/bin.
Users of VisualGDB can proceed with the ulx3s/Hazard3-Doom/VisualGDB/ instructions.
Linux users can bake their own cake. To make things easier:
wget \
    https://raw.githubusercontent.com/ulx3s/Hazard3-Doom/main/scripts/full-install.sh \
    https://raw.githubusercontent.com/ulx3s/Hazard3-Doom/main/scripts/check-system-requirements.sh

chmod +x ./full-install.sh
chmod +x ./check-system-requirements.sh

./full-install.sh
Build
To get started more quickly, use the published ULX3S 85F pair fpga_ulx3s_85f.bit and hazard3-doom-ulx3s-85F.h3img from the bin directory.
To build everything from source:
Build for ULX3S 85F
cd "${WORKSPACE}/Hazard3-Doom"
./scripts/build-ulx3s-85f-doom.sh
Important ULX3S 85F outputs include:
build/fpga_ulx3s_85f.bit
build/ulx3s-85f/monitor/hazard3-boot-monitor.elf
build/ulx3s-85f/doom-image/hazard3-doom.h3img
build/ulx3s-85f/hazard3-boot-monitor.hex
Build for ULX3S 12F
The compact 12F target defaults to a 32 MiB SDRAM map, a 40 MHz Hazard3 clock, and the 320x200 Doom/video path.
cd "${WORKSPACE}/Hazard3-Doom"
./scripts/build-ulx3s-12f-doom.sh
Build for ULX4M-LD 85F
The hardware-qualified ULX4M-LD profile uses a 40 MHz Hazard3/AHB clock and a 60 MHz LiteDRAM user clock. The complete board build creates the matching monitor, FPGA bitstream, and Doom image under the board-scoped build paths:
cd "${WORKSPACE}/Hazard3-Doom"
./scripts/build-ulx4m-ld-doom.sh
The current default routing checkpoint is seed 83 with HeAP
timingweight=30. Treat that as a regression checkpoint for the current RTL,
toolchain, and generated LiteDRAM files rather than a portable guarantee. Any
complete rebuild that materially changes the netlist or tool flow should be
rerouted and requalified on hardware.
Current FPGA validation
These seeds are for the 0.2.0 release.
See the latest default seeds in scripts/build-ecp5-bitstream-common.sh.
Routing time is taken into account when choosing default seeds.
| Target | Seed | Routed result | Status |
|---|---|---|---|
| ULX3S 85F | 11 | clk_sys 52.24 MHz |
PASS at 50 MHz |
| ULX3S 12F | 82 | clk_sys 42.70 MHz |
PASS at 40 MHz |
| ULX4M-LD 85F | 83 | clk_sys 43.63 MHz; LiteDRAM 67.51 MHz |
PASS at 40 MHz / 60 MHz; selected release route |
These are regression checkpoints for the current RTL, seeds, and tool flow, not portable timing guarantees. Rerun routed timing after material netlist or toolchain changes.
Build only Console Monitor
This step is included in the “build everything” but can be run separately when the FPGA RTL does not change:
cd "${WORKSPACE}/Hazard3-Doom"
./scripts/build.sh
For a software-only ULX4M-LD monitor matching the qualified 40 MHz FPGA, keep the test ELF separate from the complete board-build output:
HAZARD3_BUILD_DIR="$PWD/build/ulx4m-ld-monitor-test/monitor" \
HAZARD3_MEMORY_PROFILE=64m \
HAZARD3_SYS_CLK_HZ=40000000 \
    ./scripts/build.sh
Program the FPGA
Use the Hazard3-Doom Device Tool or fujprog for the ULX3S test path. ULX4M-LD uses its DFU bootloader with openFPGALoader; after writing the user image, dfu-util -a 0 -e explicitly leaves DFU and starts it. The bitstream configures the FPGA with the soft RISC-V CPU and its peripherals.
For standalone micro-SD cold boot, the validated FPGA configuration must already be stored in onboard SPI flash. The micro-SD card carries the Doom application and IWAD, not the FPGA bitstream. After power-up, the ECP5 configures from SPI flash, the resident monitor initializes SDRAM and micro-SD, and Doom launches from DOOM.IMG and DOOM.WAD. (see Load SD Card, below)
Program the ULX3S with fujprog from WSL
The locally built ULX3S 85F bitstream is ${WORKSPACE}/Hazard3-Doom/build/fpga_ulx3s_85f.bit; the 12F build creates ${WORKSPACE}/Hazard3-Doom/build/fpga_ulx3s_12f.bit.
On Windows, fujprog requires the default FTDI VCP/D2XX driver.
The current ULX3S OpenOCD ft232r path has been verified with WinUSB as well as libusbK,
so libusbK is no longer mandatory. If you also use the browser WebUSB flasher,
WinUSB is the convenient shared choice for WebUSB and OpenOCD/GDB.
Changing the FT231X driver does not reset the FPGA.
cd "${WORKSPACE}/Hazard3-Doom"

# Locally built bitstream:
./bin/fujprog-v48-win64.exe ./build/fpga_ulx3s_85f.bit

# Or use the prebuilt ULX3S 85F bitstream:
./bin/fujprog-v48-win64.exe ./bin/fpga_ulx3s_85f.bit

# Locally built ULX3S 12F bitstream:
./bin/fujprog-v48-win64.exe ./build/fpga_ulx3s_12f.bit
The compact 12F FPGA image uses a small bootstrap rather than the full resident monitor in EBR. After programming the 12F FPGA and starting OpenOCD, load the SDRAM-resident monitor with:
./scripts/load-firmware-12f.sh
Program the ULX4M-LD with DFU from WSL
The locally built ULX4M-LD bitstream is ${WORKSPACE}/Hazard3-Doom/build/fpga_ulx4m_ld.bit.
The ULX4M Micro-B DFU device uses VID:PID 1d50:614b; this is separate from
Tigard JTAG/UART.
Enter DFU by removing power, holding PCB BTN3, and reconnecting the ULX4M
Micro-B USB cable. After VID:PID 1d50:614b appears, release BTN3; it does
not need to remain held during programming. If WSL reports Permission denied
for either bundled Windows executable, restore its executable bit first.
cd "${WORKSPACE}/Hazard3-Doom"
chmod +x ./bin/openFPGALoader.exe ./bin/dfu-util.exe

./bin/openFPGALoader.exe --dfu \
    --vid 0x1d50 --pid 0x614b --altsetting 0 \
    ./build/fpga_ulx4m_ld.bit

# Leave the DFU bootloader and execute the stored user image.
./bin/dfu-util.exe -a 0 -e
If the UART is silent and OpenOCD can read ECP5 IDCODE 0x01113043 but reports
dtmcontrol is 0, first confirm the board has left DFU and the user bitstream
is running.
ULX4M-LD Tigard quick debug setup
Use Tigard in JTAG mode, target power OFF, 3.3 V reference. Configure Windows once and keep it this way:
| Tigard USB interface | FT2232H channel | Driver | Use |
|---|---|---|---|
| Interface 0 | A | FTDI VCP | 115200 UART COM port |
| Interface 1 | B | libusbK | OpenOCD JTAG |
Do not install libusbK on Interface 0 or the UART COM port disappears. OpenOCD
uses ftdi channel 1; the qualified LFE5UM-85F IDCODE is 0x01113043. The
established Tigard setup has no target reset wire connected.
Start OpenOCD with:
./bin/openocd.exe -d2 \
    -f ./third_party/Hazard3/example_soc/ulx4m-openocd-tigard.cfg
Then load the 40 MHz monitor in another terminal. The board-specific GDB command file deliberately selects the monitor generated by the complete ULX4M-LD build:
./bin/gdb/riscv-none-elf-gdb.exe -batch \
    -x scripts/gdb/load-ulx4m-ld-85f-monitor.gdb
On the monitor, run s and require external_memory_ready=YES, then run q.
The current qualified route also passes k (40 MiB heap stress), d (Doom
memory/timer smoke test), and x (copied RV32 execution from DDR).
OpenOCD
This step is not required when loading from the SD card. (see Load SD Card, below)
The following instructions are specific to the ULX3S. This example uses OpenOCD to load firmware for the RISC-V soft CPU.
A version built with RISC-V architecture support is required. RISC-V support is included in mainstream OpenOCD releases from version 0.12.0 onward. See also riscv-openocd.
NOTE The ULX3S on-board FT231X requires OpenOCD built with ft232r bit-bang support, such as xPack OpenOCD.
NOTE On Windows, the current ULX3S OpenOCD ft232r path works with the on-board FT231X bound to WinUSB or libusbK.
WinUSB is preferred when the same machine also uses the Hazard3-Doom browser WebUSB flasher. The default FTDI VCP/D2XX driver is still required by Windows fujprog. Zadig can switch the FT231X binding when needed.
Windows users of VisualGDB can find a copy of the tools in the ESP32 toolchain:
C:\SysGCC\esp32\tools\openocd-esp32\v<version>\openocd-esp32\bin\openocd.exe
Alternatively, use the OpenOCD executable in the ./bin directory. Verify that any other downloaded OpenOCD build includes both RISC-V and ft232r support.
A small config file can be used with all the initial commands:
# Probe config specific to ULX3S.

adapter driver ft232r
ft232r vid_pid 0x0403 0x6015

# Note adapter_khz doesn't do anything because this is bitbanged JTAG on aux
# UART pins, but... it's mandatory

adapter speed 1000

ft232r tck_num DSR
ft232r tms_num DCD
ft232r tdi_num RI
ft232r tdo_num CTS
# trst/srst are not used but must have different values than above
ft232r trst_num RTS
ft232r srst_num DTR

# This is the ID for the *FPGA's* chip TAP. (note this ID is for 85F version
# of ULX3S -- if you have a different ECP5 size you can either enter the
# correct ID for your ECP5, or remove the -expected-id part). We are going to
# expose processor debug through a pair of custom DRs on this TAP.

set _CHIPNAME lfe5u85
jtag newtap lfe5u85 hazard3 -expected-id 0x41113043 -irlen 8 -irmask 0xFF -ircapture 0x5

# We expose the DTMCS/DMI DRs you would find on a normal RISC-V JTAG-DTM via
# the ECP5 TAP's ER1/ER2 private instructions. As long as you use the correct
# IR length for the ECP5 TAP, and use the new instructions, the ECP5 TAP
# looks a lot like a JTAG-DTM.

set _TARGETNAME $_CHIPNAME.hazard3
target create $_TARGETNAME riscv -chain-position $_TARGETNAME
riscv set_ir dtmcs 0x32
riscv set_ir dmi 0x38

# That's it, it's a normal RISC-V processor now :)

gdb report_data_abort enable
init
Run the OpenOCD server in a dedicated terminal window. The project launcher is the preferred path:
cd "${WORKSPACE}/Hazard3-Doom"
./scripts/start-openocd.sh
Or invoke OpenOCD directly when you need explicit options:
cd "${WORKSPACE}/Hazard3-Doom"

# Set debug level 2
./bin/openocd.exe -d2 -f ./third_party/Hazard3/example_soc/ulx3s-openocd.cfg
Or from a DOS prompt:
.\bin\openocd.exe -f ".\third_party\Hazard3\example_soc\ulx3s-openocd.cfg"
Expect output like this:
gojimmypi:~/Hazard3-Doom
$ ./bin/openocd.exe -d2 -f ./third_party/Hazard3/example_soc/ulx3s-openocd.cfg
xPack Open On-Chip Debugger 0.12.0+dev-02228-ge5888bda3-dirty (2025-10-04-22:44)
Licensed under GNU GPL v2
For bug reports, read
        http://openocd.org/doc/doxygen/bugs.html
DEPRECATED! use 'gdb report_data_abort', not 'gdb_report_data_abort'
Info : clock speed 1000 kHz
Warn : DEPRECATED: auto-selecting transport "jtag". Use 'transport select jtag' to suppress this message.
Info : JTAG tap: lfe5u85.hazard3 tap/device found: 0x41113043 (mfg: 0x021 (Lattice Semi.), part: 0x1113, ver: 0x4)
Info : datacount=1 progbufsize=2
Info : Disabling abstract command reads from CSRs.
Info : Examined RISC-V core; found 1 harts
Info :  hart 0: XLEN=32, misa=0x40801106
Info : [lfe5u85.hazard3] Examination succeed
Info : [lfe5u85.hazard3] starting gdb server on 3333
Info : Listening on port 3333 for gdb connections
Info : Listening on port 6666 for tcl connections
Info : Listening on port 4444 for telnet connections
Info : accepting 'gdb' connection on tcp/3333
Info : Disabling abstract command writes to CSRs.
Error: No working memory available. Specify -work-area-phys to target.
Warn : not enough working area available(requested 1100)
Info : dropped 'gdb' connection
If OpenOCD is already running, you may need to kill it first:
REM DOS/Windows:
taskkill /F /IM openocd.exe 2>nul
netstat -ano | findstr LISTENING | findstr :3333
The final working-memory messages may appear when GDB compares sections. They do not indicate a failed firmware load if load and compare-sections completed successfully.
Load Firmware with GDB
This step is not required when loading from the SD card. (see Load SD Card, below)
Load the board-specific monitor built with the same clock/memory profile as the
FPGA image. OpenOCD must already be running. Do not use an old generic or test
ELF from ./bin; a stale monitor can run well enough to blink LEDs while using
the wrong UART divisor or an obsolete Doom-image protocol.
The repository now provides one GDB command file for each supported FPGA target:
scripts/gdb/load-ulx3s-85f-monitor.gdb
scripts/gdb/load-ulx3s-12f-monitor.gdb
scripts/gdb/load-ulx4m-ld-85f-monitor.gdb
Each helper selects the monitor produced by the corresponding complete board build:
ULX3S 85F:    build/ulx3s-85f/monitor/hazard3-boot-monitor.elf
ULX3S 12F:    build/ulx3s-12f/monitor/hazard3-boot-monitor.elf
ULX4M-LD 85F: build/ulx4m-ld/monitor/hazard3-boot-monitor.elf
GDB can be downloaded from the xPack GNU RISC-V Embedded GCC releases, or
the Windows riscv-none-elf-gdb.exe can be found in the bin directory.
From WSL/Bash, for ULX3S 85F:
./bin/gdb/riscv-none-elf-gdb.exe -batch \
    -x scripts/gdb/load-ulx3s-85f-monitor.gdb
For ULX4M-LD 85F:
./bin/gdb/riscv-none-elf-gdb.exe -batch \
    -x scripts/gdb/load-ulx4m-ld-85f-monitor.gdb
For ULX3S 12F:
./bin/gdb/riscv-none-elf-gdb.exe -batch \
    -x scripts/gdb/load-ulx3s-12f-monitor.gdb
When entering equivalent commands manually, remember that WSL is still Bash:
use forward-slash paths and \ line continuation. Windows Command Prompt uses
backslash paths and ^ continuation. Do not paste cmd.exe syntax directly into
Bash.
The shell loader remains available when you intentionally want to name an ELF explicitly:
# ULX3S 85F
./scripts/load-firmware.sh \
    ./build/ulx3s-85f/monitor/hazard3-boot-monitor.elf

# ULX4M-LD 85F
./scripts/load-firmware.sh \
    ./build/ulx4m-ld/monitor/hazard3-boot-monitor.elf

# ULX3S 12F
./scripts/load-firmware-12f.sh
After a successful load and compare-sections, the monitor should respond on
its board UART at the configured 115200 baud and accept Doom image/IWAD uploads.
Load Doom Executable
This step is not required when loading from the SD card. (see Load SD Card, below)
This step requires an active resident monitor and the Doom image created during the build. The normal ULX3S 85F FPGA image already contains the resident monitor, so a GDB firmware load is optional unless updating the monitor. The ULX3S 12F instead requires ./scripts/load-firmware-12f.sh after FPGA programming because its compact image contains only the UART bootstrap.
The ULX3S requires an external 3v3 USB-to-UART adapter connected as shown:
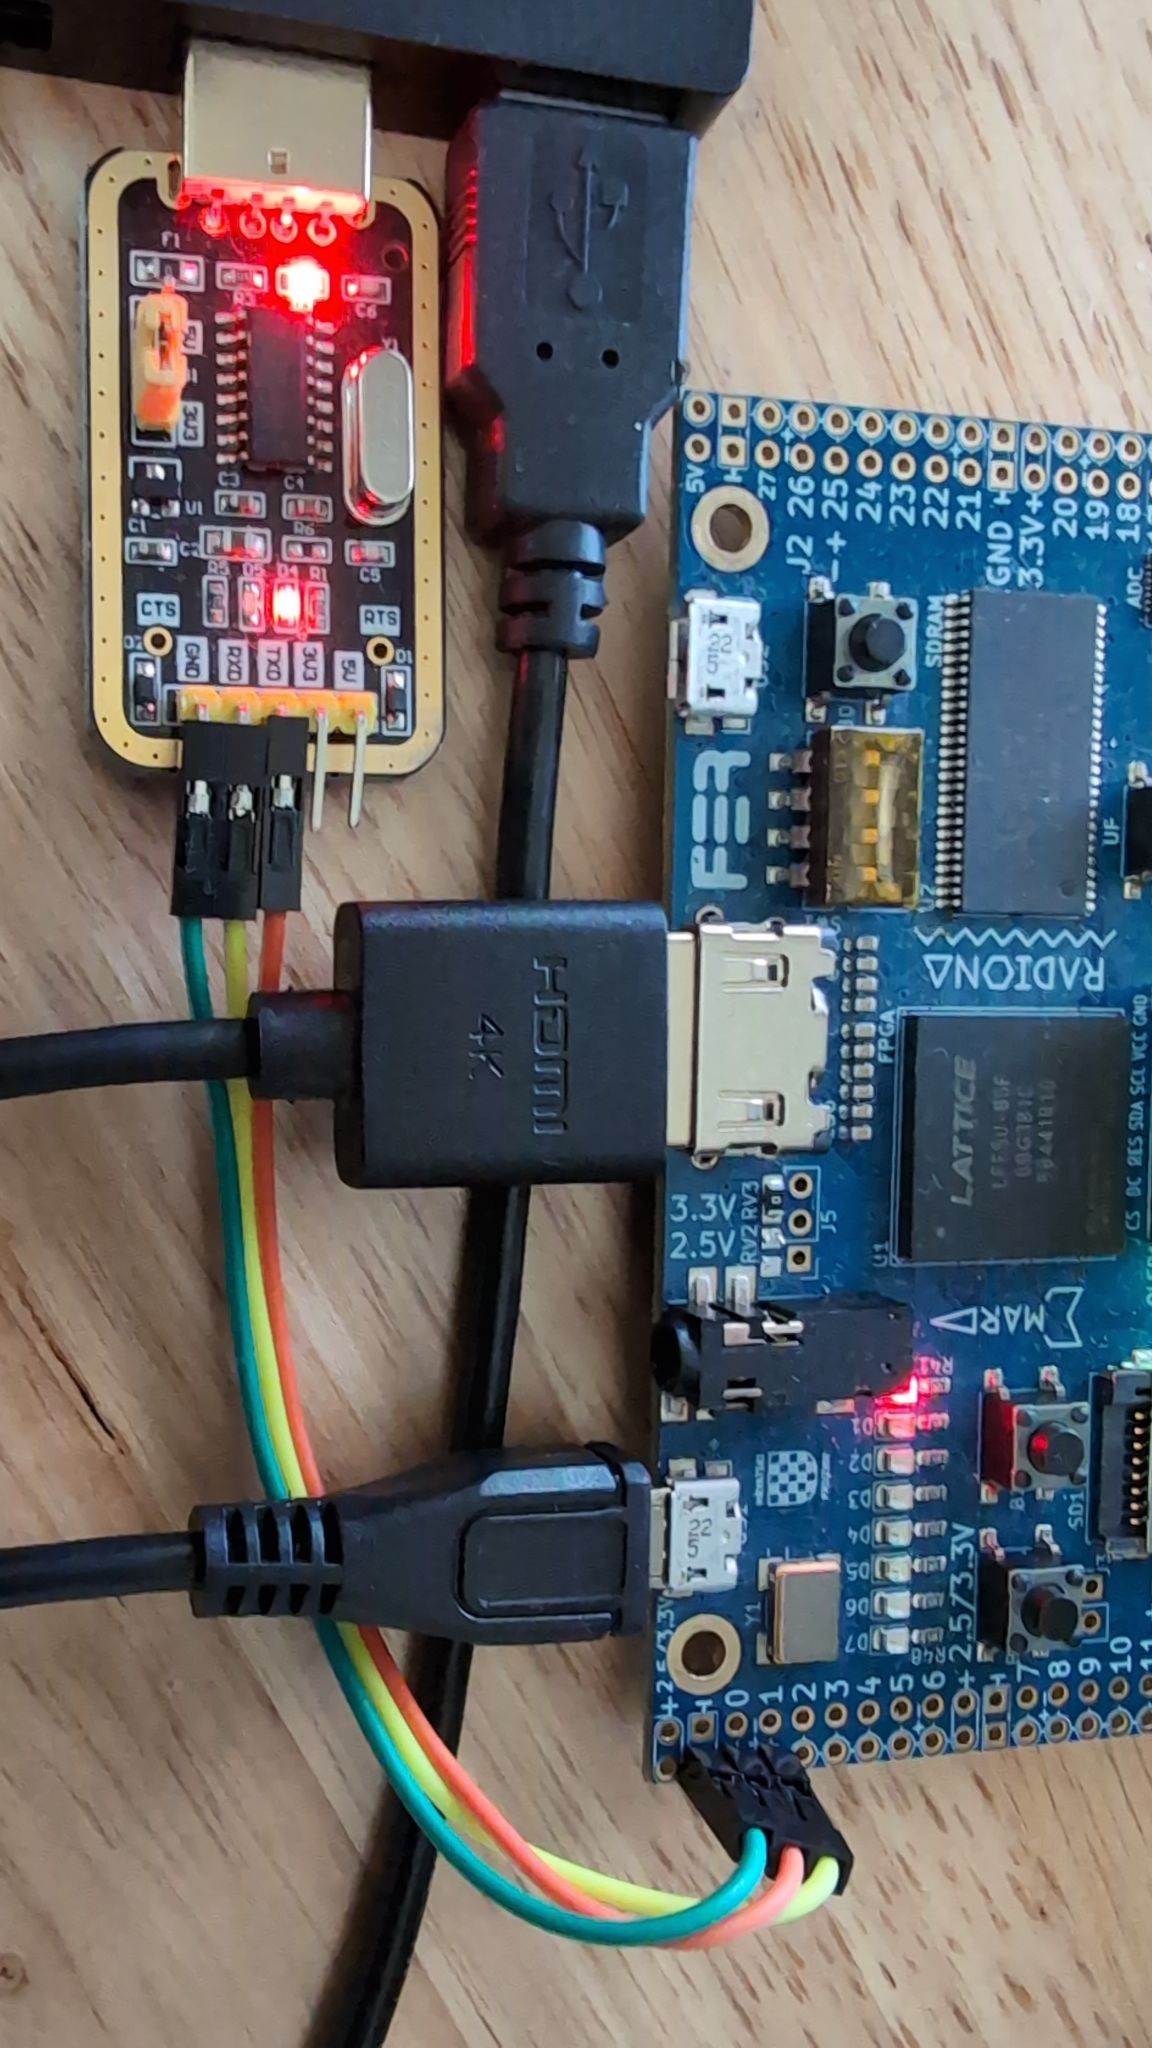
The hosted Hazard3-Doom Device Tool can perform both UART transfers directly in the browser: connect the board UART under Serial connection, then use Doom H3IMG uploader and Doom IWAD uploader under Device uploading.
The command-line uploader remains available when preferred. Load the Doom image produced by the complete board build. For ULX3S 85F:
cd "${WORKSPACE}/Hazard3-Doom"

./doom/upload-doom-image.py \
    ./build/ulx3s-85f/doom-image/hazard3-doom.h3img \
    --port /dev/ttyS7
Replace /dev/ttyS7 with the serial port connected to the USB-to-UART adapter.
For ULX4M-LD, use build/ulx4m-ld/doom-image/hazard3-doom.h3img and the Tigard
VCP UART port.
For Windows PowerShell, depending on the specific serial port:
py ./doom/upload-doom-image.py `
    ./build/ulx3s-85f/doom-image/hazard3-doom.h3img `
    --port COM7
Load a WAD
This step is not required when loading from the SD card. (see Load SD Card, below)
The ULX3S uses the external USB-to-UART adapter shown in the previous step. Place a compatible IWAD, such as DOOM1.WAD, in the wads directory before uploading it.
cd "${WORKSPACE}/Hazard3-Doom"

./doom/upload-wad.py ./wads/DOOM1.WAD --port /dev/ttyS7 --launch
For Windows PowerShell, depending on the specific serial port:
py ./doom/upload-wad.py ./wads/DOOM1.WAD --port COM7 --launch
The command-line IWAD uploader defaults to --memory-profile auto: it queries the running monitor with v and selects the monitor’s 32m or 64m WAD region. Use an explicit --memory-profile 32m or --memory-profile 64m only for an older monitor that does not report memory_profile. The H3IMG image must still match the board build.
Load SD Card
When using the ULX3S SD Card, for instance formatted in Windows like this (note FAT32 file system)
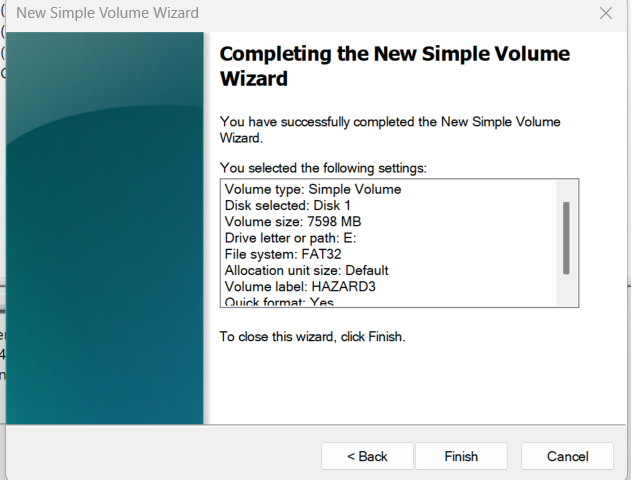
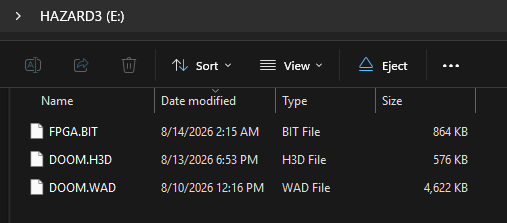
The validated FPGA configuration is stored separately in onboard SPI flash. Copy only the Doom files to the root of the FAT-formatted micro-SD card, named exactly:
DOOM.IMGDOOM.WAD
DOOM.WAD is the canonical IWAD filename used by the current cold-boot flow. The monitor supports FAT16/FAT32 root-directory files with 8.3 names, including fragmented files.
For example, like this:
Connect to Monitor Console
Connect to the serial port with your favorite terminal program, such as PuTTY. There are diagnostic commands, some of which are memory-destructive.
When upload-wad.py is run with --launch, Doom starts automatically. From the monitor, press j to launch or restart Doom manually.
Doom interactive HDMI loop: READY

  controls: W/S or arrows move/turn, Z/C strafe, F/space fire, E use

  M map, P pause, 1-7 weapons, Enter select, Esc menu

  Esc backs out of menus; Ctrl-X returns to monitor; j restarts
Other monitor-console commands are available:
Commands:
  h or ?  help
  m       destructive reserved 1 MiB SDRAM test (heap-safe)
  a       sparse 64 MiB address/bank alias test
  r       pseudorandom 1 MiB test in each SDRAM bank
  q       complete SDRAM qualification suite
  k       SDRAM heap allocation/stress test
  d       Doom platform memory/timer smoke test
  x       execute copied RV32 code from SDRAM
  l       receive a packaged Doom image over UART
  w       receive an IWAD into reserved SDRAM
  j       launch/restart the validated Doom image and IWAD
  b       run the micro-SD boot loader
  c       print SD/FAT boot status and counters
  f       rewrite/present the 320x200 RGB332 HDMI test frame
  z       reset heap; invalidates every heap pointer
  s       status
  v       version
  sao info / recover / scan / probe / read / write
  sao gui launch the I2CDriver-style HDMI diagnostic interface
  i2c scan
  i2c gui  alias for sao gui
Full Clean
cd "${WORKSPACE}/Hazard3-Doom"

./scripts/full-clean.sh
Troubleshooting
Here are some common troubleshooting suggestions.
Timed out waiting for loader response
The UART uploader sends the monitor’s load command and waits for an H3L READY
reply before transmitting the payload. A timeout therefore means the expected
monitor did not answer on that UART at that baud; it does not mean the Doom
payload itself failed CRC validation.
Use the board-specific hazard3-boot-monitor.elf produced by the same build as
the FPGA/bitstream instead of an old generic/test ELF. For example, ULX4M-LD
uses:
build/ulx4m-ld/monitor/hazard3-boot-monitor.elf
A stale monitor can be particularly misleading: LEDs may blink even though the
monitor was built for a different system clock or an older image-header format.
For a 40 MHz ULX4M-LD image, normal communication is still 115200 baud. If an
old monitor only responds near 92160 baud, or responds with H3L ERROR invalid
header to a newly generated .h3img, replace it with the current board-specific
monitor rather than treating 92160 as the supported baud rate.
Example timeout:
$ ./doom/upload-doom-image.py \
    ./build/ulx4m-ld/doom-image/hazard3-doom.h3img \
    --port /dev/ttyS8
Opening /dev/ttyS8 at 115200; payload=590944, CRC32=0x6cb6e796
error: timed out waiting for loader response
Verify OpenOCD/JTAG, load the current monitor, confirm compare-sections, then
retry the UART upload at 115200.
Missing required executable
Ensure the scripts are marked as executable if an error such as this is encountered:
$ ./scripts/build-ulx3s-85f-doom.sh
Missing required executable: /home/gojimmypi/Hazard3-Doom/scripts/build-ulx3s-85f-bitstream.sh
Initialize Hazard3 recursively or set HAZARD3_ROOT correctly.
gojimmypi:~/Hazard3-Doom
$ ls /home/gojimmypi/Hazard3-Doom/scripts/build-ulx3s-85f-bitstream.sh
/home/gojimmypi/Hazard3-Doom/scripts/build-ulx3s-85f-bitstream.sh
If the file exists but is not executable, restore its executable permission:
chmod +x ./scripts/build-ulx3s-85f-bitstream.sh
Error ft232r not found
Ensure the ULX3S on-board FT231X is using WinUSB or libusbK when running the current libusb-based OpenOCD ft232r path. WinUSB has been verified working and is preferred when you also use the browser WebUSB flasher. The default FTDI VCP/D2XX binding is for FTDI-native applications such as Windows fujprog.
This error can occur when OpenOCD tries to use an incompatible Windows binding:
$ ./bin/openocd.exe -d2 -f ./third_party/Hazard3/example_soc/ulx3s-openocd.cfg
xPack Open On-Chip Debugger 0.12.0+dev-02228-ge5888bda3-dirty (2025-10-04-22:44)
Licensed under GNU GPL v2
For bug reports, read
        http://openocd.org/doc/doxygen/bugs.html
DEPRECATED! use 'gdb report_data_abort', not 'gdb_report_data_abort'
Error: libusb_open() failed with LIBUSB_ERROR_NOT_SUPPORTED
Error: ft232r not found: vid=0403, pid=6015, serial=[any]

./third_party/Hazard3/example_soc/ulx3s-openocd.cfg:40: Error:
Traceback (most recent call last):
  File "./third_party/Hazard3/example_soc/ulx3s-openocd.cfg", line 40, in script
    init
Cannot find JTAG cable
After changing drivers the ULX3S is still not recognized by fujprog: try unplugging, wait, then reconnect US1. Confirm with Zadig that the FT231X binding matches the tool: FTDI VCP/D2XX for Windows fujprog, or WinUSB/libusbK for the current OpenOCD path.
ULX2S / ULX3S JTAG programmer v4.8 (git 96ebb45 built Oct  7 2020 22:42:00)
Copyright (C) Marko Zec, EMARD, gojimmypi, kost and contributors
FT_Open() failed
Cannot find JTAG cable.
Web Serial no longer finds the external UART after debug activity
The Web Serial UART and the ULX3S FT231X/JTAG connection are separate USB devices. A verified Windows/Chrome failure mode is that Chrome logs the external COM port as removed during a debug session and does not add it again when OpenOCD is simply stopped. PuTTY may still be able to open the COM port because Windows still has the serial device, while Chrome’s Web Serial enumeration remains stale.
Recovery:
- Close PuTTY, upload scripts, and other serial-port owners.
- Stop OpenOCD.
- Physically unplug and reconnect the external USB-UART adapter. Stopping OpenOCD alone may not force Chrome to re-enumerate it.
- Check
chrome://device-log/?types=Serial,USB&refresh=1for a freshSerial device addedevent. - Use Connect in the Hazard3-Doom web UI to reopen the browser device chooser.
Do not change the external UART adapter to WinUSB merely because the ULX3S FT231X uses WinUSB. A normal CH340/CH341 UART should remain on its normal Windows serial driver so it continues to provide a COM port.
Error: could not open port Access is denied
The scripts must have exclusive access to the serial ports. If anything else is connected, an error like this may occur:
C:\temp\Hazard3-Doom>py .\doom\upload-doom-image.py .\build\ulx3s-85f\doom-image\hazard3-doom.h3img --port COM7
Opening COM7 at 115200; payload=586272, CRC32=0xc94f45cf
error: could not open port 'COM7': PermissionError(13, 'Access is denied.', None, 5)
The error above may also occur if the Tx or Rx pins do not have a good electrical connection. Use a 3.3 V USB-to-UART adapter, cross TX/RX, connect the adapter ground to ULX3S ground, and do not connect the adapter VCC pin.
No such file or directory: DOOM1.WAD
A Doom wad file is not distributed in this repository. Find a Doom WAD file, such as the doom_dos.ZIP/DOOM1.WAD
in the DOOM v1.9 (Shareware Episode, 1995) zip download.
py ./doom/upload-wad.py ./wads/DOOM1.WAD --port COM7 --launch
error: [Errno 2] No such file or directory: 'wads\\DOOM1.WAD'
Warning No such file or directory
Compile in WSL and load firmware with DOS to encounter this error.
Running RISC-V GDB...

GDB: "C:\temp\Hazard3-Doom\bin\gdb\riscv-none-elf-gdb.exe"
ELF: "C:\temp\Hazard3-Doom\build\ulx3s\monitor\hazard3-boot-monitor.elf"
uart_getc_nonblocking (value=<synthetic pointer>) at /mnt/c/temp/Hazard3-Doom/src/main.c:250
warning: 250    /mnt/c/temp/Hazard3-Doom/src/main.c: No such file or directory
Note that /mnt/c/ is from WSL and is not a valid path in DOS.
Learn More
- Stable ULX Hazard3-Doom: github.com/ulx3s/Hazard3-Doom
- ULX forked Hazard3 RISC-V submodule from github.com/ulx3s/Hazard3
- Doomgeneric submodule from: github.com/ozkl/doomgeneric
- HDMI Enclosure: github.com/gojimmypi/ulx3s-elecrow-7inch-hdmi-enclosure
- Tigard: github.com/tigard-tools/tigard
- The gojimmypi dev branch: github.com/gojimmypi/Hazard3/ulx-doom-dev
- Visual Studio File Explorer
- Visual Studio Verilog Syntax Highlighter
- Another tale of building a Doom port for RISC-V
Development Status
The scripts/hazard3-doom-source-status.sh may be helpful in determining the status of various submodule branches.
Pull requests for Wren6991/Hazard3 should be opened on develop branch. See contributing notes.
gojimmypi repository owner compares
Active Development Compare
- gojimmypi Hazard3
ulx-doom-devvs release ulx3s/Hazard3/ulx-doom … gojimmypi/Hazard3/ulx-doom-dev
Hazard3 Doom Project
Hazard3 RISC-V CPU submodule vs upstream ulx3s/Hazard3 repository branches:
- ulx3s/Hazard3/stable … gojimmypi/Hazard3/ulx-doom-dev (dev vs stable)
- ulx3s/Hazard3/develop … gojimmypi/Hazard3/ulx-doom-dev (dev vs upstream develop, PR here)
- ulx3s/Hazard3/ulx-doom … gojimmypi/Hazard3/ulx-doom-dev *
ulx-doomis main production branch
Hazard3 RISC-V CPU submodule vs upstream Wren6991 repository branches:
- Wren6991/Hazard3/stable … gojimmypi/Hazard3/ulx-doom
- Wren6991/Hazard3/develop … gojimmypi/Hazard3/develop
- Wren6991/Hazard3/develop … gojimmypi/Hazard3/ulx-doom
Doom Generic
- https://github.com/gojimmypi/doomgeneric (no gojimmypi development branches)
ulx3s repository owner compares
Pull requests for Wren6991/Hazard3 should be opened on develop branch. See contributing notes.
- Wren6991/Hazard3/stable … ulx3s/Hazard3/ulx-doom
- Wren6991/Hazard3/develop … ulx3s/Hazard3/develop
- Wren6991/Hazard3/develop … ulx3s/Hazard3/ulx-doom
- ozkl/doomgeneric/master … ulx3s/doomgeneric/ulx-doom
Hazard3 scripts
Beware the third_party/Hazard3/scripts directory is an upstream Wren6991 fpgascripts submodule
currently pinned to commit 1e76886592 and without a ulx-doom fork or branch at this time.
Of particular interest there is the synth_ecp5.mk makefile. Use caution when editing for contribution or saving to github.
Chat and support
Discord Channel
- https://discord.gg/qwMUk6W (problems/question/general chat); #hazard3-doom
Gitter Channel
- https://gitter.im/ulx3s/Lobby (Focused on development)
Back to ULX3S project site. Improve this page.